I went ahead and caught some video of Morpheus practicing his nosework homework tonight. We did the searches in the front room, where Morpheus usually only goes when we're on the way out for a walk, or going out to the car when he goes on a car ride. The rest of the time he doesn't have access to this area. Normally if he got to come in here, he'd run around and sniff the whole room to explore the space - but notice how focused he is on the search.
You might also wonder why Mike has him on leash. We're doing this for two reasons - first so he doesn't rush up the stairs and scare the cats to death (which he'd normally try to do the second he gets the chance) - but notice his lack of interest in looking for the stairs. Second, and really more relevant, I want to do trials in tracking with him, and he will need to be used to being on leash for them. Some dogs get distracted during searches when they're on leash (particularly when they're first starting) - but it doesn't affect Morpheus a bit. A lot of dogs will look to their person when on leash for some indication of what to do - but Morpheus is more than happy to drag Mike around when he's on a search.
I want to note here that we've got his leash attached to his regular buckle collar, not the prong collar we use to walk him. We've done this for two reasons as well. first, so we don't accidentally hinder him from going where he wants to go by using the prong collar, and second so he can make a distinction between the two very different behaviors we're expecting from him, depending on the collar he's wearing on leash. prong collar = behave and quit pulling, while buckle collar = dog leads the person wherever he wants to go and searches for goodies. (before we got started he was whining and trying to pull Mike into the front room too. he's quick about figuring out which collar means what, and he was dying to go play his favorite game).
You'll notice several boxes and quite a few other objects scattered around the room in the videos. We used chunks of hotdogs for his treats (at home that works - outside of the house he was more interested in doing other things than in finding or eating hotdogs, so we use a higher value treat when we leave the house). The hotdog is always in the smaller white box. This makes it easier for Mike to know where the treat is - but more importantly, the small white box is the only one that smells like the prize, which is a big deal for the dog. spreading the scent around to multiple boxes would confuse the issue, and change the nature of the game. we want him to use his nose to find the scent, not confuse him by making everything smell like the prize.
This week we were asked to make a bit of a puzzle out of it for him, so in addition to the boxes, I threw in a number of other things that were handy. The other objects (as well as the extra boxes) do a couple of things. they provide extra places for him to search, they can be obstacles for him to work out how to navigate around to get to the scent, and they can actually trap, channel, and concentrate the scent to help him track it. so yes, that is why the vacuum is sometimes knocked over in the middle of the room in the videos. ;)
In a lot of these, he saunters straight over to the box like he knew just where it was, even though I put it in a different place each time, and used totally different areas of the room. In a couple he does a little more sniffing around the room before he gets to it. He's really good at this, which is why he sometimes goes straight to it. He's using his nose and ignoring a lot of other things in the room that would normally be very fun for him to explore. In the last one I put the box on the stairs - and normally he gets in some big trouble for getting near the stairs, but that didn't stop him from following his nose over there (nor did it encourage him to go sauntering up the stairs) - he stayed on task and found the treat, even though it was in a rather unusual spot - we had never put it on the stairs before. I put it there to try to make it more of a challenge for him. it's getting tough to make it a challenge because he's so good at this!
--Enjoy!
Sunday, January 30, 2011
movies galore (& more)
the oscar nominees were announced on tuesday - and given my recent obsession with movie watching, it should come as no real shocker that i was anxiously waiting for them to be announced. i'm really excited to watch them this year, and i want to be prepared for them. in the past i've watched them and not really known what half of the movies were about. this time i'm planning a movie night for the friday before oscar night to watch some of the nominated movies. a number of the nominees are still out in the theater, so i've spent some time this weekend going to see those. in fact, i've seen a number of movies this weekend. I saw Baarìa with Mike on Friday night. It's an Italian movie, by the same director (Giuseppe Tornatore) who did Cinema Paradiso, which is one of my favorite movies (in the uncut version anyway). I found that while I did enjoy Baarìa, it wasn't nearly as good as Cinema Paradiso was.
Mike is working on his comprehensive exams, so I didn't bug him to come with me for the rest of my weekend adventures, and to be quite honest, it was kind of nice to go out and spend some time alone checking out things I love. I went to the Bellevue Art Museum to see the Ginny Ruffner exhibit. She's a sculptor who works with glass and metal. I found her use of glass totally refreshing. I feel the same way I do about glass as I do about ceramics. I think they both have this time honored stigma of being used for vessels and practical purposes. Go in your kitchen, I'm willing to bet you have both glass and ceramic dishes in your cupboard. Though both (of course) are used for other types of artwork, you also tend to see a lot of glass bowls and ceramic pots even in museums. I always love it when I see something that totally breaks out of those traditional uses for those materials, and Ginny Ruffner certainly does that. Her work explores a theme of genetic engineering, and hybrid forms that incorporate aspects of the animal kingdom as well as the plant kingdom. Though her work is relatively abstract, you do get the feeling of animalistic as well as plant based elements. More than anything else, I enjoyed her use of color. She used it in really surprising ways, especially contrasted with the metal. In one piece in particular she used glass that was similar in hue to the metal that was used, and relied on the differences in surface quality to differentiate between the two, the glass being somewhat transparent and luminescent, while the metal was not buffed and left somewhat dull, and did not radiate light, but instead had something of a dull mirror-like quality to it. In other pieces she did just the opposite, where the metal was almost a neutral backdrop for incredibly bright spots of luminescent color. I really enjoyed her work, and I'm especially looking forward to seeing a documentary on her next weekend at the Tacoma Art Museum. (the exhibit at BAM goes through next weekend, and if you're in town and have the time - I definitely recommend it).
while I'm on the topic of glass art, i might as well share that I have been invited to apply for a scholarship for a summer class at Pilchuck. I've never used glass as a medium before (unless you count an awful stained glass piece that I did in middle school, and have since lost), but this class is focused on painting with glass, and past experience with glass is not a requirement. After my very thought provoking experience with using clay like paint - I would very much be interested in experimenting with glass from a painter's perspective. My problem is that the class would be a fairly expensive couple of weeks. I had just decided not to apply at this time, when I got an e-mail from them inviting me to apply for the scholarship. So I'm going to go ahead and apply for the program and the scholarship later this week and see what happens. It would be an amazing experience - so cross your fingers for me!
I spent the rest of my saturday down in Tacoma at the Grand. I saw back-to-back oscar nominees: True Grit, and The King's Speech. I enjoyed them both, but I liked The King's Speech somewhat better. Seeing True Grit jogged my memory, and I am almost certain that I've seen the 1969 original. I vaguely recall that I was unable to sleep one night when I was living in Pittsburgh, and caught it on tv, and the original was quite good if my memory is accurate. I find myself somewhat confused, though, that Jeff Bridges is nominated for Best Actor, while Hailee Steinfeld is only being nominated for Best Actress in a Supporting role. I would argue that Hailee was the leading character in that movie, while Jeff Bridges held the supporting role - considering that the movie is about Mattie's (Hailee's character) determination to catch her father's killer. (though I should note that I did really love Jeff Bridges performance in the movie). I'd personally like to see Helena Bonham Carter get the oscar for Best Actress in a Supporting Role for her work on The King's Speech. Considering her past movies (Alice in Wonderland, Fight Club, Harry Potter, etc), it seemed like an unusual role for her - but she really stepped up and did an amazing job in the role.
I got up this morning and went straight to the theater downtown Kent to see The Fighter. I hadn't actually heard much about this one, but thought I might as well take advantage of the fact that it was still in my local theater to see it while I can. And I'm glad I did - it was a great movie. Of the nominees I've seen this weekend, I'd choose this one for Best Picture over True Grit and King's Speech. (though personally I prefer Black Swan over all of them).
Then I went straight down to Tacoma to see Alfred Hitchcock's The Man Who Knew Too Much. It was playing at a theater downtown - and I always think it's great to be able to see the great old ones when they're in the theater. Mike couldn't go with me (because of those exams), and I had bought tickets in advance. I asked around to see if anyone else would like to go, but in the end I went to this one by myself too. Which again was kind of nice. I've enjoyed having some time to myself this weekend. I donated my extra ticket at the door and asked them if they thought anybody could use it. The lady taking tickets told me she thought she knew just the guy who could use it. She said something about he was off looking for his wife. I didn't quite catch the story - but I do hope that someone was able to use it. It was a fun one - and of course, I do usually like James Stewart.
My favorite cousin is moving back to WA, and is flying in next Saturday. I learned yesterday that he's really been wanting to go and see Black Swan. I also learned he's a big Aronofsky fan. (to which I told him that he was a seriously cool relative, since I didn't think anyone else I'm related to would know who Aronofsky is, nevermind be a fan of his work). We agreed that The Fountain was fantastic, and "criminally underrated" to quote my cousin. I told him I think Black Swan is even better. Since he'll be in town so soon, I invited him to go and see it with me next weekend. I'd absolutely love to see it again!
I have an update about my dog for you too. You may recall that I took him to his first nosework class last weekend - and he was uninterested in the treats (which I had been worried about), and then he pee'd on the floor. Not the great start I hoped we'd get off to.... but this weekend I took him to his second class. I came prepared with a different variety of treats - and so did the instructor. she gave me some freeze dried liver treats to try - which Morpheus LOVED. I also delayed his breakfast and made him go hungry to see if that would make a difference. (don't worry he got breakfast when he got home) ;) ...I'm not sure which one made the difference, but he was a changed dog. With the first search he didn't quite know what we were supposed to be up to, but as soon as he discovered the liver treat in the box, he knew exactly what game we were playing. From then on he was exactly like he is at home with the nosework game. It's tough to stump him, and he can find his prize pretty quickly. in fact, he routinely found the treat faster than any of the other dogs, and he was sure running around the room sniffing quicker than the other dogs. He's also not shy about shoving his head right into the boxes and knocking things over when they're in his way. (one of the other dogs in his class is exactly the opposite. she gets nervous if she even gets close enough to barely touch one of the boxes. if she knocked them around like Morpheus does, she'd probably have a doggie heart attack. she reminds me of a dog version of Masaaki). Morpheus also did not pee on anything this week. i guess the correction he got last week for it was enough to make him think twice about where the toilet is.
I'm going to try to get a video of him doing his nosework homework this week, so you can see him "at work" - it's really pretty awesome to see him do it.
Saturday, January 22, 2011
my busy week & a color update
s u n d a y
my long and busy week started last sunday with a full day of figure drawing. I went to Gage for another long pose (it's a 3 hour model session w/ the same pose), and then headed over to Dr. Sketchy for a couple of hours of shorter poses w/ a burlesque model, Miss Kitty Baby. It was definitely a fun day. Here are a couple of my favorites from the day:
This one is from Gage, and it was a nice change of pace to work from a male model.

And this is Miss Kitty Baby from Dr. Sketchy

By the time I got home from all of the drawing sessions on Sunday, I had to rush to finish up a couple of discussion questions for my Capella class before trying to get to bed at a decent hour. (which reminds me, My final class at Capella started last week. It finishes in mid-March, and will conclude my post-bacc project management certificate! Looks as though it's going to be a nice class to end with, too. It's centered around leadership, and I have plenty of experience with it in the classroom).
m o n d a y
Monday was a little crazy. I had the day off for MLK day, and although I really probably would have enjoyed dedicating the day to volunteer work or something - I took advantage of the weekday off to go and take care of my car. The nagging check engine light was still on, and I had an appt. with my (awesome) mechanic to figure it out once and for all. He had taken a brief look at it for me last friday after work, and wanted to take a closer look at my fuel injector, which is why I went back on Monday. He told me the testing he wanted to have done would take about half the day - and so I wandered down the street and settled in at Cutter's Point for a cup of tea, thinking I'd finally be able to get in some time to sit and read. I'm still trying to get through the Harry Potter series - and I've been making a real effort at it lately, but have found this week in particular that I have a serious lack of time to actually sit and do the reading.
Not an hour later I got a call from my mechanic, who told me what the problem was (I don't actually remember what it was), and (here's the important part) he told me it should be covered under warranty. I had thought my warranty was up, but apparently not. He assured me he had contacted Saturn, and double checked for me that it would be covered. Nice of him isn't it? He could have just done the work and charged me for it, and I really wouldn't have known the difference. Having a mechanic I know I can trust is priceless.
And so I picked up my car, and drove out to the old Saturn Dealership (they still work on Saturns). They told me they had to check it out themselves, but that if the problem my mechanic cited was verified, it would indeed be covered under warranty. While I was waiting for them to do their own evaluation, I went and had lunch with Hillary. I got a call from Saturn verifying the problem (which was no big surprise), and the lady told me they would need to keep my car for about a week to fix it. She said it would be totally covered, including a rental for me to drive while they fixed it... except she didn't have a rental in. I had to wait a couple of days for a rental to come in. but that concluded my Monday car adventure.
I was intending to go to my Monday evening zumba class - and I didn't realize until I drove all the way out there that it had been canceled for the holiday. That worked out well, since Harvey came to dinner that night for dinner too. Since the class was canceled, she was able to stop by a bit earlier and hang out longer.
t u e s d a y
Tuesday was a waiver day at work - it just means that staff attend, but students don't, and there's supposed to be some sort of training involved. for us it meant a staff meeting to discuss some stuff that very well may not even apply to me next year for scheduling. I was thanked at the meeting for the "work" they've had me do around the building so far this year. I thought that was very nice of them. Half the time my efforts at work go completely ignored, so I did really appreciate that they bothered to take the time to recognize it - though I thought it was a bit ironic & funny that it happened THIS year, considering they've got me mostly sitting around doing nothing, compared to previous school years where i've put in loads and loads of hard work that went largely unrecognized.
During the second part of the work day, I had requested time to go to a training through the district for gang awareness. I'm glad I did because it would have been another boring and wasted day for me otherwise, as teachers were given time to work in their classrooms for that part of the day. (and being that I have no classroom as of yet, I wouldn't have had much to do). The gang awareness was interesting. It was lead by a police officer who had been working on the gang problem since the '80's. He emphasized that the gang problem was down city-wide lately, but I did learn a few things that should help me to recognize gang related chatter and symbolism if it should happen to show up in my classroom (assuming they get around to assigning me to one, that is).
I had a few errands to run after work on Tuesday too. I finally dropped off my late videos at Stadium Video, and I rented The Fountain. It's a Darren Aronofsky film that Hillary had mentioned, and I wanted to see it before I went to see Black Swan (also Aronofsky). I had a small check to pick up at the district office too. It was reimbursement for something that I had paid for, but never arrived. I had mistakenly thought that I needed to drop my car off at Saturn too - so naturally I drove all the way out there only to find that I had misunderstood, and that I needed to wait until they called me. I got home in time to make a quick dinner and rush back out the door to go to Jazzercize.
w e d n e s d a y
Wednesday was a nice day of calm. My gentle yoga class started back up on Wednesday. It's an earlier class than the other workout classes I've been going to - so it gave me a little more time in the evening afterward. Mike wanted to move the Wii upstairs, and so we went up to that room and moved around a couple of boxes to make space. I still ended up with a little time for homework - which was nice. I got a good chunk of it done. I've completely neglected the reading this week, but at least the graded work is nearly finished. I even had time to watch my tv boyfriend in the new White Collar my dvr picked up!
t h u r s d a y
After the day of calm on Wednesday, of course Thursday would have to be a busy one. I had another bunch of errands to run after work. I headed back to Stadium Video to rent movies for my Friday Movie Nite (the theme was films based on literature - i narrowed it down to classic novels that i had read, but movies i hadn't seen yet. it still produced a decent list of films, and several that i was really looking forward to seeing weren't available. even so, I still came home with 9 films).
Then I tried again to drop off my car at Saturn - and was successful this time. The front desk lady who had helped me each time I came in had actually snagged the key for the rental she wanted to give me, and hid it in her purse until I got there, just to make sure nobody loaned it out to another customer. Sweet of her, isn't it? (i thought so!) The rental car looks exactly like my car except it's silver instead of red - and has absolutely no extra features. driving it makes me feel like i'm in a ghetto version of my car. the most annoying things include (but are certainly not limited to) the fact that there isn't a key fob to lock/unlock it remotely, which means i end up standing in the rain fumbling with the key... i can't set the headlights to auto, which means i keep forgetting to turn them on and it keeps screaming at me when i try to get out of the car and leave them on.... and i can't figure out how to make the clock work. it most certainly does not work the same way as mine does - so it's an hour off, and it will only show me what time it is when i hit the button that is supposed to let me change the time - except it won't actually let me change the time. most of the time it only displays what radio station i'm listening to... which is stupid because i already know what it's on & i'd really rather know what time it is).
I got home again in time to eat a quick dinner and rush out to my jazzercize class. Meanwhile i got a text msg from my young cousin telling me he's moving back to WA and was looking into starting classes at a tech school. I'm looking forward to having him live closer to me again (he's currently living in ID). He's one of my two favorite relatives (the other being my grandma, who lives even farther away in the midwest). He's an interesting and thoughtful individual, and i was very excited to hear that he's trying to get into school. He has loads of potential, and I'm looking forward to seeing where it leads him. We've had some great conversations, and he's recently started writing. He has fantastic critical thinking skills, as well as great communication skills - and I continue to be surprised at how insightful he is. I think he's on his way to great things.
When I got home I (finally) watched The Fountain - only to realize that I've seen it before - and cleaned up the house a bit for Friday's movie nite. I couldn't believe that I didn't recognize the title or the description of the movie - but within just a couple of minutes of starting it, I knew I had seen it before. I liked it the first time around, and liked it just as well the second time. It's a great movie, and I'm glad I re-watched it. Now knowing a little more about Aronofsky, it was interesting to contrast it with a couple of his other (older) films. I certainly preferred this one - but I like the layers and thought that go into his films.
f r i d a y
Friday was great - I try not to plan any errands or chores for my movie nights. I was in the mood for fruit, and so I probably bought too much fruit at Tacoma Boys on my way home - and cutting up all of my fruit probably delayed my movie watching a bit. But Julie and Pat both came over, and we enjoyed The Fountainhead, The Handmaid's Tale, and Kubrick's Lolita. In this case it was interesting not only to compare between the book and the film, but also between Kubrick's other films dealing with topics of this nature in Clockwork Orange and Eyes Wide Shut. There was certainly quit a bit of evolution going on in his work between the '60's and the later films - though it was still quite groundbreaking for the '60's I'm sure. I've still got 6 other films that I'd like to find time to watch before I have to return them.
s a t u r d a y
Today I took Morpheus to his first nosework class. He is really not a very food motivated kind of a dog. not much at all, actually - but he does like to sniff. He does play a hide and seek game at home with a bone filled with peanut butter, and it's his favorite game ever. So at the class, this translated into him trying to sniff every inch of the classroom, and completely ignoring all of the treats. then he pee'd on the floor. That was awesome and embarrassing. (at least we caught him in the act, and corrected him - turning it into a teaching opportunity for him). on the upside, the nosework teacher did note that sniffing - particularly in unaltered males like Morpheus - usually makes them need to pee. In fact, she said that is the case to the point that in the nosework classes all dogs (regardless of gender and fertility status) are taken out to pee between searches. So at least my dog wasn't just being a jerk.
Then I drove down to Tacoma for a couple of errands before meeting Hillary for dinner and a movie. I went in to the Tacoma Gene Juarez and had them wash/dry/style my hair. that was freaking awesome (and blew my recent Super Cuts experience right out of the water). it was comfortable, relaxing, and the stylist was skilled. I left with perfect hair. Not only that, but she did the entire thing from start to finish in 50 minutes. that is less than HALF of the time it takes me at home! i foresee far less manual labor in my future in the washing-my-own hair department.
Here's a photo of the Gene Juarez experience today - Jessie did a lovely job! (if I look a bit tired, it's most likely due to the jam packed week I've had) :)

I got in a little shopping before I met Hillary too. I'm going to Harvey's baby shower tomorrow, and did some shopping for that. She's having a boy, and I just can't get excited about most of the little boy baby clothes - they're just not that exciting. (can you tell I want a girl when I have a kid?) ;)
I met Hillary at Indochine for dinner - and I remember Jacob once telling me that it was expensive.... which I thought was kind of odd and funny once I saw the menu, which featured pretty normal prices. I had a great beef curry - if only I could live on curry!
Then we went to see Black Swan. It was phenomenal! It was by far my favorite Aronofsky film yet, and Natalie Portman did an amazing job. I loved the layers of meaning woven throughout the film. Hillary mentioned the colors, which shift subtly throughout the film as the character develops - and later I realized that when Natalie Portman's character is describing the storyline for Swan Lake, she's actually also describing the plot of the movie itself. It was dark, yet beautiful, and quite brilliant.
c o l o r s
Now... for an update I've been wanting to post about all week, but haven't had time. (if you've been paying any attention to this post whatsoever, you'll notice that I've been quite busy this week) ;)
I've let my weld pigment project sit, undisturbed for most of the week. It does appear that it's finished settling - and notice that the sediment has settled in two layers. that's not just a photography trick, it really looks that way. I'm not sure what caused the two layers. If I can find some time soon - It's definitely ready to rinse and filter.

The next three photos are of my lichen experiment. The color has been developing and darkening all week. It started as a golden amber color last weekend, and has deepened and become a red-orange color over the course of the week. It seems to change a bit daily. I'm keeping it on my bathroom counter so I remember to aerate it each morning when I go in to brush my teeth. It's been a convenient way to do it - but probably won't be very practical with a full size batch later.
This first photo shows the setup - it's covered with plastic most of the time. I remove it once a day to swirl it around and aerate it. it's tough to see the actual color in this photo though.

I tipped the container a bit for the next photo, so you can see a halo of the color around the edge. It looks kind of orange-pink here. It's a bit of an exaggeration of the actual color - Although it does seem to be showing a slight tendency toward pink, it's not nearly as pink as this photo. (not that the photo is that pink to begin with).

This last photo gives a little better impression of the actual color. I've found that looking at it each morning, it's easiest to see the color by looking up through the bottom of the container - so I took a photo of it that way too. It gives a good idea of how dark the color has become since last weekend. I'm very curious to see what the color does from here. From what I've read, it's really too early to be able to tell if it's going to go red or purple, or stay a yellow or orange hue. This one is a fun experiment, since there's no way to tell what results I should expect. It's like a color experiment surprise.

Saturday, January 15, 2011
Lichen
I have read that you can make dye from lichen. However there is a big environmental concern with making this kind of dye. Lichen grows slowly, and harvesting enough of it to produce a dye can harm the local lichen population. So it's not something a person should do unless they really know what they're doing, so as to prevent damaging the environment. because of this, I never really expected to have an opportunity to try making dye with lichen.
Enter the November wind storm. A friend and co-worker of mine from Mt. Tahoma HS, who teaches plant biology, had several trees come down during the wind storm. Not wanting the trees to go to waste, she brought in tons of branches so her students could make wreaths and swags for the holiday season. Knowing that the district was keeping me in limbo over at Wilson, she contacted my principal and asked if I could come over to Mt. T and help out for a couple of days. When I arrived, and we got the branches into the building - she pointed out on one of the branches "look at this, this is lichen!" and proceeded to tell me how it was a symbiotic relationship between fungus and algae. and there was a TON of it on the branches she had brought in. I couldn't believe my luck - and during any moments when I wasn't helping students those couple of days - I was harvesting lichen. Since the trees were already down and removed from their environment, there wasn't any damage I could do by taking them. Lucky break for me, huh?!!
Since I don't really expect to find another lucky batch of lichen any time soon, I've been kind of hesitant to experiment with it. And since I've never done it before, I'm nervous about screwing it up. It's not as if I can (or rather should - since I really could if I were so incline) run outside and go get more of the stuff any time I want.
Wondering if I could get some guidance from someone who may have done it before, I asked Louis if he had used it before (and mentioned my hesitancy about experimenting with it). He hadn't used it - but made the very wise suggestion that I try experimenting with a tiny amount of it to see what I can get out of it.
Here's the thing about lichen - I don't know what type I've got (and there are tons of varieties - which I've read are difficult even for an expert to identify by a photograph alone), so I don't really have a lot of hope of discovering what type I've got at this point either. Some lichen will produce a red or a purple dye - while most of it will give you a yellow, brown, or earthy green. I have also read that the way to get the purple or red dye (assuming you have the right type of lichen) is with the ammonia fermentation method.
and here's the thing about the ammonia fermentation method - it's not exactly fermentation that's going on. it's probably just called fermentation because it sits for so long in the ammonia solution. I did find great instructions for doing it, though! I read that I need to use 2 parts water, 2 parts lichen, and 1 part ammonia. It needs to be aerated regularly, and covered between aerating. It also needs to sit for about 3 weeks for the color to develop. I've read that it may look yellow or brown for the first week, even if it's going to turn out red or purple.
So here's what I did:
I took a tiny little glass container (it's actually one of those little votive candle holders), and added a teaspoon of dried, chopped up lichen.

Then I added 2 teaspoons of water and 1 teaspoon of ammonia. (I found that using only 1 teaspoon of water and half a teaspoon of ammonia didn't provide enough liquid for a batch this tiny. those proportions would undoubtedly work much better for a larger batch, so i added more liquid - still keeping the water and ammonia in the right proportion to each other). You can sort of see in this picture that the liquid has turned a yellowish color. I'm interested to find out if it stays that way, or if I'll be lucky enough to get a red or a violet.

Then I gave it a good whirl, and covered it with plastic wrap. It's sitting upstairs next to my bathroom sink where I'll see it each morning and remember to aerate it by giving it a good whirl.

* I'm going to take a moment here to note that all of the kitchen type supplies you've seen me use for dying and pigment making are from a set that I reserve only for art supplies. Although they look like they're food utensils, I never re-use them in the kitchen for food. I'm very careful not to mix them, since accidentally contaminating food with art supplies can be quite dangerous.
Friday, January 14, 2011
Orange Madder & Weld Yellow
At long last, here are a couple of photos of my madder orange dye, a byproduct of my madder pigment project. I had read that you can obtain a brilliant orange dye by boiling the madder.... so I did just exactly what you're not supposed to do with madder dye - I boiled it. (gasp). ~ if you're wondering why this is so taboo - it's because heating madder too hot (above about 50*C) destroys the desirable alizarin colorant in the roots. There are, however, a number of colorants in those roots.
I also used my favorite fiber for this project - it's a wool/alpaca blend. I've used it twice now, and both times it's taken the dye very well. I had also read that the boiled (gasp) madder dye makes the best orange with a tin mordant - and so, as mentioned in my last post, I used a tin mordant for this fiber. I have since bottled my tin mordant and am keeping it in the fridge for next time. I've read that I can keep it indefinitely and just re-charge it with 3/4 of the amount of tin next time I want to use it. It makes things simpler for me (especially now that I have a dedicated dye mini-fridge for my studio), and it keeps my tin out of the water system or my back yard soil, since I'm not dumping it. As it turns out, it is also a fairly economical mordant, as it requires only a very small amount added to the water. I only needed 0.05oz to the water to mordant the fiber for this project.
 above is the madder dye simmering (gasp) with my wool/alpaca fiber. I simmered it for a good hour before letting it cool in the pot over night.
 I am having a real problem getting a good photo of the color of the finished wool. It is in fact more orange than it shows in this picture. It is indeed a bit earthy, but it is nowhere near as tan/brown as it seems in this photo. It is a definite orange. I have a feeling that if I had used fresh madder and simmered it from that - it would have been a quite intense, bright orange. Probably still a bit earthy, but very intense for an earthy orange would be my guess - and exactly what I had read about.
Weld
After letting my weld soak over night in distilled water, I boiled it for an hour, and then filtered it. I wanted to use my cotton dish towels to filter it, as I had done with the madder - but the one I was looking for had mysteriously gone missing. (I strongly suspect that Mike has something to do with that - and if I find it in a strange place, I'm sure it will turn into a Mike Story). But alas, I couldn't find it, and so I used a coffee filter instead. Which I hated. coffee filters are slow, clog too easy, and the paper becomes pretty weak when it's wet. I found them to be more annoying than anything else.
 Here's the coffee filter catching some of the weld leaves and stems. I found it to be such a slow process with the coffee filter that I tried to keep most of the leaves and stems out of the filter, and instead scooped them up (with gloved hands, of course) and squeezed them over the filter to save time. (if you know me, you know how impatient I can be at times) ;)
 Here's a shot where you can see the strained liquid below. It looked fairly orange at this point - a lot like tea.
 See that dark spot above?? THAT is a big patch of sediment from the weld that made it through my stupid coffee filter. I had to filter the dye three times to get it all out. I still think my cotton towel would have done a better (and certainly faster) job of catching a lot of this. I probably could have gotten away with straining it once through the towel, and then once through filters to achieve a nice clear dye.
 I switched to chemical filter papers for the second and third filtering. I went through several of them - but they didn't clog as easy, and strained quite a bit faster than the coffee filters. They're also significantly stronger when wet than the coffee filters are, and don't tear and break so easy. I do like them, and am researching my options for getting some bigger ones. My science friend Tam pointed me to Fisher Scientific, which has a rather large and overwhelming selection of them. I'm fairly sure that an inexpensive, fast flow variety will suit my needs - but even within that category there are a lot of options. (even more options if you ignore the "inexpensive" bit).
I wish I had remembered to take a photo of the dye once I finally filtered all of the muck out of it. It was a nice, clear, golden orange color. I still have half of the weld left, and will try to remember to take a photo of that stage next time I work with it.
The photo below shows what it looked like right after I added the calcium carbonate (chalk). I had read about dyers using a bit of chalk at the end of the heating phase, to "bloom" the color - and it was a real blast to see it for myself! part science, part art - I got to watch it change within seconds from a transparent orange tea-color to a pretty opaque lemon yellow color. Sure the photo below looks a lot like buttermilk - but I assure you it was a lemon yellow color. (stupid photography).

This next photo may look reminiscent of an over sized, oddly colored glass of beer - but it's a photo of the weld after I added the alum solution. It foamed up like mad - I'm probably lucky it didn't spill over. My instructions for the madder project called for letting it sit at this phase for several days, giving it a quick stir every now and then, until it stops foaming - so that's exactly what I'm going to do with the weld too.

I let it sit over night, and this is what I woke up to the next morning. It had settled pretty well at the bottom, and some of the foam had disappeared - although there was still quite a bit of it. I gave it another stir (after which it looked pretty much like the last photo again, with somewhat less foam). Since then, the foam has mostly gone away, and there is now just a little foamy film on top. I'm going to let it sit for at least another day - maybe two. Then I can start rinsing it.

For this weld project, I had to guess at the amounts of chalk and alum to add, as I couldn't find anything on the subject to use as a guide. I couldn't even find what proportion they should be in compared to one another. In the end, I used my madder project as a guide. It had called for close to two and a half ounces of each alum and potash. In this case I was using chalk instead of potash (and my new acquaintance, Louis, helped to clarify the differences he's noticed between using chalk, potash, and soda ash - Thanks Louis!). I used 2 ounces of each alum and chalk for this batch of weld. Louis has since suggested reducing the amount of each the alum and the chalk next time, and using a different proportion - with more chalk than alum. I am, of course, anxious to start a second batch to compare the difference. Louis also noted that you can obtain a less opaque pigment with weld by using either potash or soda ash instead of chalk, but that the color doesn't come out quite as nice. That came as no surprise to me, since dyers routinely add chalk to weld dye to get the best yellow. (A dyer would have no other motivation to do this, except to adjust the color).
...in fact I read an interesting anecdote posted by a dyer while I was looking for a weld pigment recipe. She had described her dyeing process as adding both a small amount of chalk to bloom the color, as well as the alum mordant straight into the weld dye. Then she noted that she had to keep stirring her dye pot continually, because the color kept settling out. She didn't seem to find this odd for a dye (as in fact it is the definition of a pigment rather than a dye if it is settling out) - and from her posting, it sounded like she thought this was a normal experience. I couldn't help thinking that after all of this time trying to find a pigment recipe - here was this woman getting one by complete accident and not even recognizing what she had discovered. I had to laugh at myself - and then I quit the research and got my own butt into the kitchen to experiment. If she could do it by accident, I could surly do it on purpose. (I didn't attempt to contact her, but if a fellow dyer should happen to find this posting and wonder about it - the solution to that problem would be to mordant the fiber separately before adding it to the dye pot)
Tuesday, January 11, 2011
Madder (Day 22) & Weld
Day 22
The madder was quite dry by today (I hadn't checked it in several days - it's probably been thoroughly dry now for some time, though) - so i geared up to go grind it. One cannot be too careful when it comes to dry pigments. Even for a pigment that isn't know to be toxic, it's not a great idea to start breathing pigment dust. (I have read, though, that madder is thought to be mildly toxic). so, on went the gloves and the dust mask. I would have worn eye protection too for good measure, except my lovable husband has lost them. I'll be replacing them shortly, as losing my sight ranks way up there on my list of fears - so anything I can do to protect my eyes is well worth doing in my book.

Below is a final picture of the dried madder on the filter papers. It has shrunk considerably. Interesting how much of that pigment muck was water, isn't it?

With gloved hands, I rubbed the dried pigment into my mortar. you can see it below, next to the now empty filter papers.

And here's a close up of what the pigment looks like, fresh from the filter papers - it's kind of chunky.

Here it is after the first grinding. Seems lighter than it was before the grinding, doesn't it?

My instructions recommended a second wet grinding, noting that you can get a finer powder this way. So I added a bit of water and ground it again. I did notice that it was significantly easier to grind once wet - and it certainly quit kicking up so much pigment dust. Once wet, I could also see the transparency of the color, which I imagine I'll also see once I mull it with linseed oil. My photo didn't really do the color justice - it was a more luminescent earthy orange than it seems in the picture. It also gave me a bit of an idea of how much oil paint I can expect to get out of this batch of pigment. Not too much by the look of it - but it should be enough for a small value study
 If I can find a little wood panel, I'm also thinking about rubbing a bit into a the wood to see the effect of using it as a wood varnish (the recipe I used was from David Rubio, who was a violin maker, and used this lake to varnish his finished violins). As it turns out, I'm missing some information that would give me the lake usually used by painters. I've been reading about madder, and know enough to know that there are a number of colorants in the root, the two principal colorants being alizarin and purpurin. Alizarin is what I'm after for the traditional painter's madder lake. I've read of two ways of extracting it from the roots (either by fermentation, or treated with acid) - neither of which methods I have found sufficient information to actually do it yet.
I have, however, discovered something quite exciting. I found a blog titled Sunsikell last week, written by Louis Bipso, in which he writes about a variety of topics of interest to me. In fact, in his latest entry, he's described the pigment lake making process. It follows pretty closely to what I have done with the madder project - however he notes that madder requires more attention and processing to obtain a good color. I discovered his blog while I was sitting at work one day last week with nothing much to do (as usual these days) - and I spent a good part of the day reading through about the past six months of entries. In addition to writing about pigment sources, natural dyestuffs, and types of pigments - he also writes about traditional methods of using the materials - which is also of interest to me. He is the only other painter I have been in contact with to date (we've chat a bit in the comments section of his blog) who even cares about where the colors from - and he not only cares, he loves it at least as much as I do. He's also quite ahead of me in the quest to discover and create color. I'm sure my blog stalking will prove to be a valuable resource as I move forward with my pigment making. For now, I'm crossing my fingers for a post soon on what he knows about madder that I haven't been able to find yet. I'm also going to hunt through a couple of books in my studio and see if one of them can help.
Weld
Growing weld sounds like it should be easy enough - but I didn't want to wait until spring to plant it, and then next fall to experiment with it - so i ordered some dried weld. My supplier was kind enough to include some helpful instructions on the label. Looks like I have enough for 2 dye baths. As with the madder, I want to make pigment out of it first, but am hoping to dye some wool with the discarded dye as well. I should get a lovely, bright yellow out of it.

My weld is currently soaking in about a gallon of distilled water over night. I'll heat it tomorrow to get the dye. Making a lake from the weld should go a bit faster than the madder did. It will also help that I've been through the process once before, so some of it will be second nature this time around.

I've got wool on the stove as I type, in a tin mordant bath (it's nothing exciting to look at, and doesn't look any different than the other photos I've posted previously of mordant baths - looks like wool in a pot with hot water). I've read the tin mordant should produce a nice orange with the madder dye I've got. I'm hoping my saved dye is strong enough. I'll find out tomorrow. I'm going to let the wool cool over night, and I'll dye it tomorrow.
Sunday, January 9, 2011
a year of figure drawing
I thought it would be fun to document my year of figure drawing for 2010. I've posted photos below from each of my figure drawing adventures for the year. I noted below each one who the model was (there are a few whose names I don't have), the month it was drawn, and at what event. Most drawings were done in 20 minutes or less - a couple were longer. For the ones that were longer, I simply noted that it was a longer drawing. I did several drawing at most of the events represented below, and sometimes it was hard to choose - but I've tried to give you the best from each session.
All of the models at the Dr. Sketchy sessions are local burlesque dancers. Roxie Moxie (November) was a bit of a challenge because she has breast implants, which made her body look somewhat unnatural (in the drawing as well as in life).
Enjoy! As always, it's fun to see how my drawing has evolved over time.
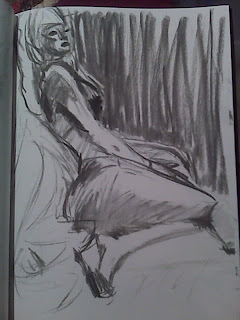 Kitten La Rue @ Dr. Sketchy in January
 Pyra Sutra @ Dr. Sketchy in February
 Iva Handful @ Dr. Sketchy in March
 Babette La Fave @ Dr. Sketchy in April
 Tamara the Trapeze Lady @ Dr. Sketchy in May
 Waxie Moon @ Dr. Sketchy in June
 Lolita "Tatas" Valentino @ Dr. Sketchy in July
 Two models @ the Little Red Art Studio in August
 Sassy Delure @ Dr. Sketchy in September
 Lydia McLane @ Dr. Sketchy in October
 Roxie Moxie @ Dr. Sketchy in November
 This was commissioned by Lori, as a present for Pat (both pictured), and was a longer drawing from a photo done in November
 Guy @ a drawing class at the Frye Art Museum in December
This was a longer drawing
(yes, Guy is his name) ;)
 Two models at Drawing Jam at Gage in December
 Rosie Bits @ Dr. Sketchy in December
Wednesday, January 5, 2011
Madder Days 14-16
Day 14
Below is a photo of the filtered pigment left to air dry in my studio - behind a closed door where cats and sudden breeze can't disrupt it. It's been sitting here un-disturbed ever since I filtered out the water. The filter on the right was from a couple of days earlier, when I filtered a bit of sediment that had been siphoned off. If you look back a few posts, you'll see what it looked like when it was sitting in the funnel just after filtering - now it looks like a few dark crumbs with a little powdery pigment caught on the rest of the filter. I've been utterly amazed at how much the volume shrinks as it dries out. If you want an immediate comparison - compare this photo with the next.

Day 16
The pigment has just been sitting and drying over the past couple of days - and will continue to do so until it has all dried. I expect at least a couple more days of waiting. To compare with the photo above, the two filter papers at the very top of this photo are the same ones from above. The top left filter is the same filter paper shown on the left in the photo above. Notice just how much the volume of pigment has shrunk over the past few days while it's been sitting and drying! The larger bits have also turned quite dark as they've dried - nearly black.

I recently added a new mini-fridge to my studio (courtesy of Craigslist, and in perfect working condition), for the purpose of storing dye when its not in use. As you can see below, I've found a nice new way to recycle my plastic water bottles. The three pink bottles on the left are a weakened version of cochineal. I've used the dye bath twice, and gotten pretty intense colors both times. I've read that you can use the same cochineal dye bath quite a few times before exhausting it. I'm looking forward to using these to get some nice medium and light pinks. The two on the right are madder that I let boil for an hour. I haven't used these yet at all, and am curious to see how the boiling will affect my result. (if you recall, the madder I used for the pigment project above wasn't heated to anywhere near the boiling point). I have read you can obtain a brilliant orange with a tin mordant and boiled madder. Time will tell - I've got tin on order, and am looking forward to giving it a try.

This one is the madder which has not been boiled, but only heated to about 40-45*C during the pigment making process. I also recharged this bath with the madder & re-heating it to 40-45*C. This is the bath that I used with an alum mordant to achieve the golden blonde color on the skein of wool (pictured below).

Here's the final photo of the wool dyed in the madder bath described above. I put it into the dye bath twice, hoping to get a darker color, but this light color was the best I could get. I do have a feeling that I would have gotten a darker color if I had used the first dye that came from the roots - which of course were used for a lake pigment this time around. I may try it again with the exclusive purpose of creating a dye for wool, just to see what happens. This time around, dying the wool was just a nice side project and a good way to re-use the discarded dye from the pigment project.
 I also find myself wondering if the wool-alpaca blend that I used for my last cochineal dye bath would have taken the color better. That particular skein seemed to absorb a surprising amount of the color from the cochineal bath. I'm very curious to try it again with a different dye to see whether those results had more to do with the dye or with the wool-alpaca blend.
Subscribe to:
Posts (Atom)