Wednesday, December 29, 2010

Madder Day 8 & 9

Day 8
Day 8 consisted of doing absolutely nothing with my madder solution. It just sat, undisturbed in the bucket all day, to allow the pigment to settle down to the bottom of the bucket.

Day 9
Today was kind of exciting madder-wise. First, a look at the tools I used today - more distilled water, a siphon & plastic tubing:

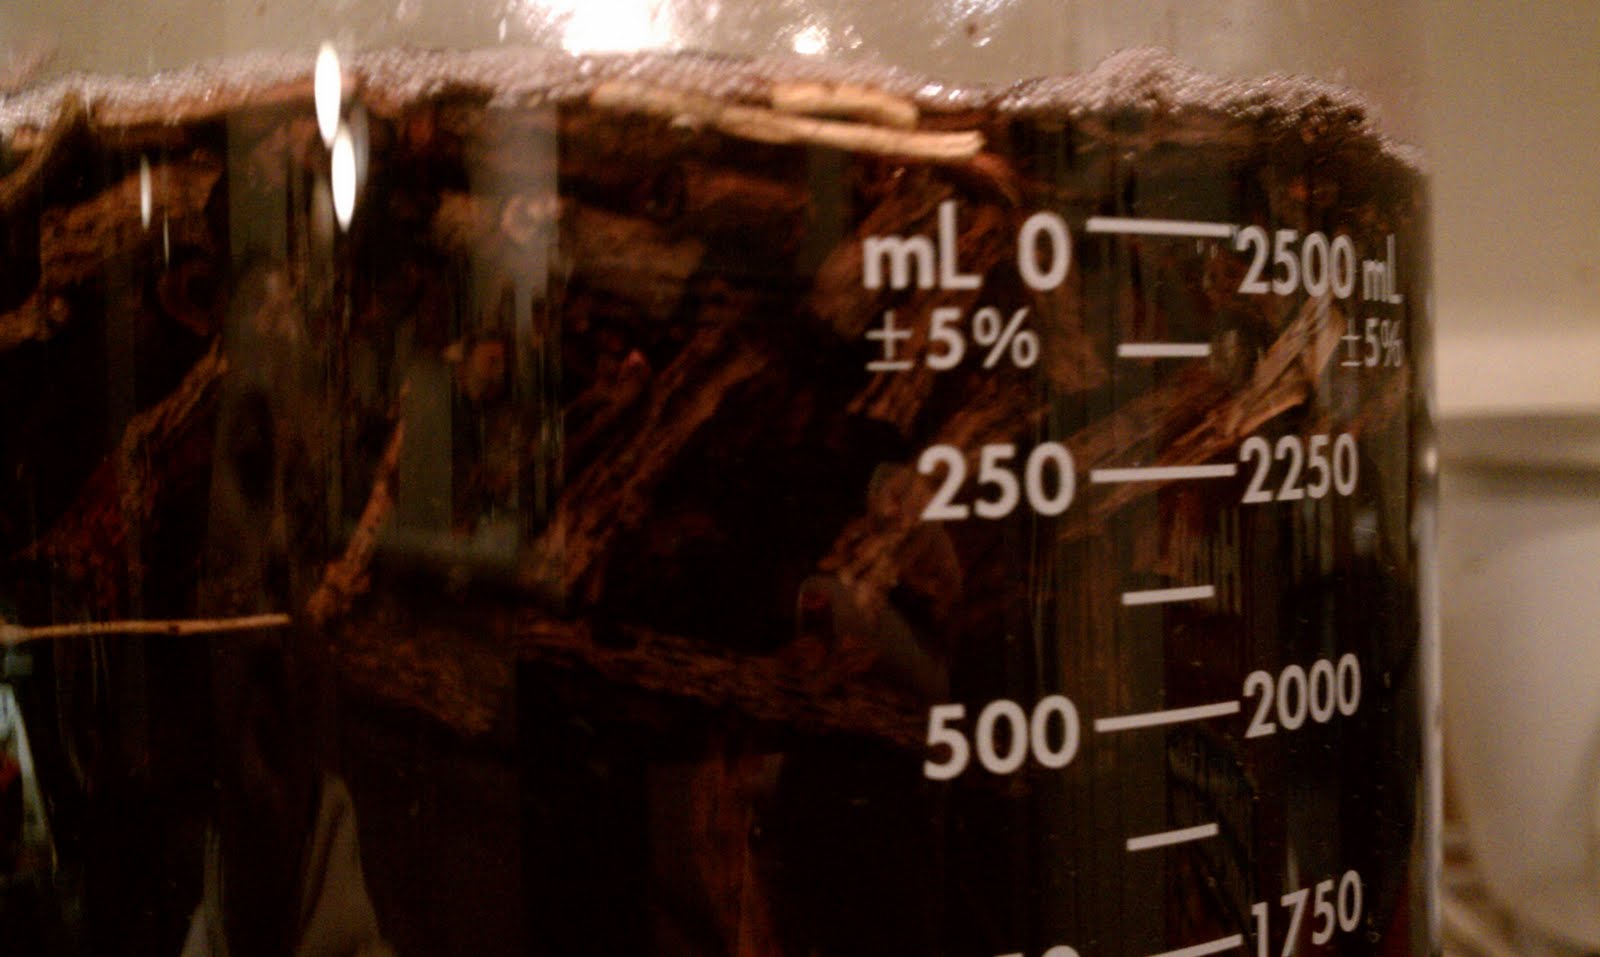
Here's a photo of the madder solution before I got started. The pigment has visibly started to settle, and the very top bit of water seems a little more translucent than the lower portion of the bucket, though it's all pretty dark at this point.

this is the siphon I got at the home brew shop. bet they didn't imagine I'd be using it for pigment washing!

I siphoned off half of the liquid (5 liters), careful not to let the siphon touch the bottom of the bucket. the last thing I want to do is disturb the precious pigment settling at the bottom.

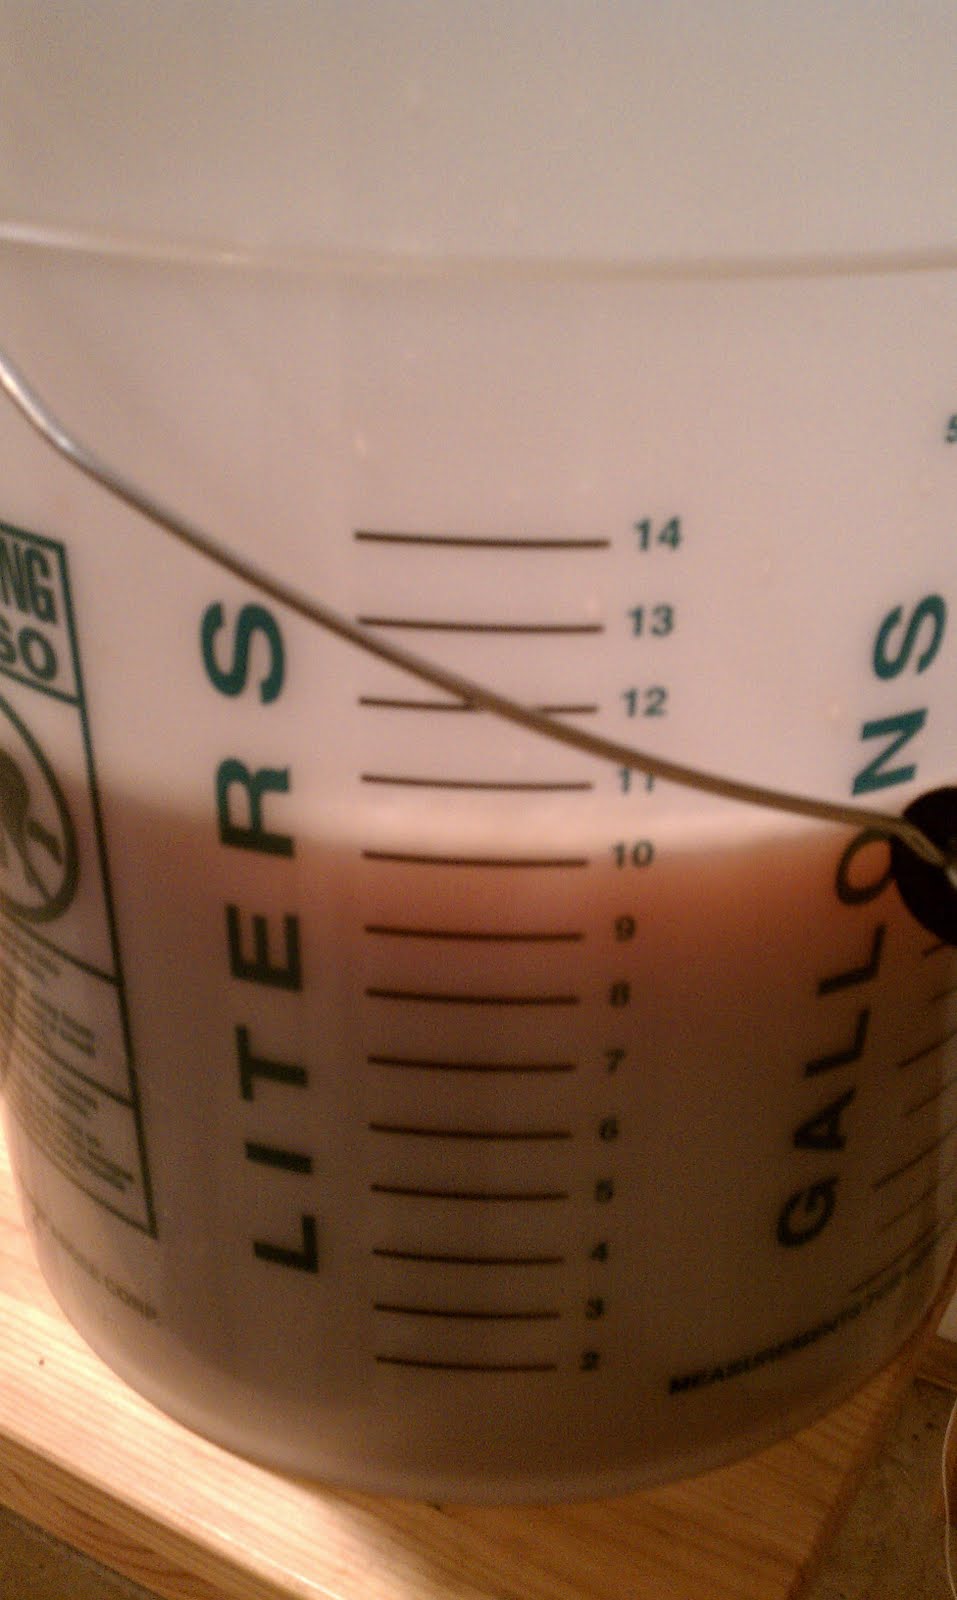
and here's the bucket on the floor, containing the 5 liters of madder dye that i siphoned off. stay tuned - it's going to be re-used!

here's a shot of the 5 liters of dye left in the big bucket.

and now to add 5 liters of fresh water to the bucket. the goal is to dilute the dye that is still in the big bucket, and wash it out before filtering the pigment out. I've got at least a couple more days of doing this before I can proceed with the filtering. my bucket of madder solution needs to sit another 24 hours before I can siphon again. Then I can siphon it once every 8 hours if I want to. I need to keep siphoning until the water I'm siphoning off runs clear.

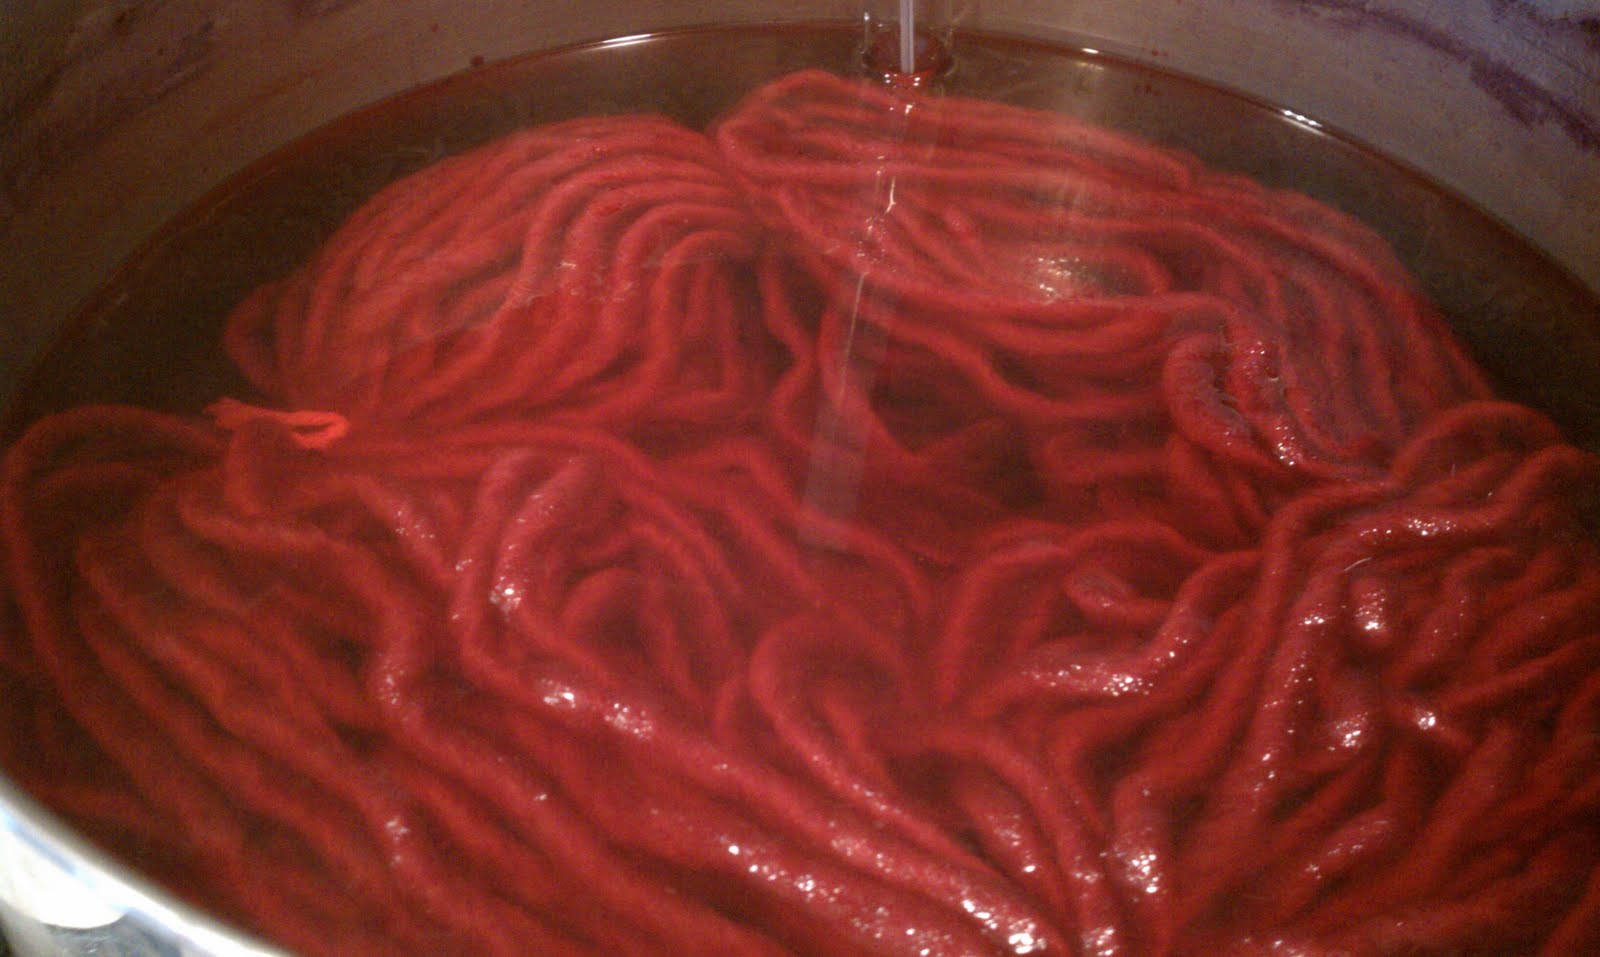
Here's my madder side project. I thought it would be a tragic waste to just dump the madder dye I siphoned off today - so I'm using it to dye a skein of wool. (good thing I keep wool on hand for occasions like this!) :)

First, a cleaning bath for the wool. I let it sit in a hot soapy bath in the sink for half an hour. Now knowing what I know about felting, I was careful not to handle the wool too much while it was sitting in the hot soapy water.

Here's my alum again - and this is what I normally use it for. It's used as a mordant for the wool, to help the dye adhere to the fiber better. and here is where math has finally actually come into play during this madder experiment. I had to weigh the wool (before I wet it down), and then use alum at 20% of the weight of the wool. The wool was 3.65 ounces, and so I used approx .73 ounces of alum. (or as you may remember, my scale does the nearest .05 of an ounce - so I measured out .70 of alum, and then added tiny amounts until it barely bounced up to .75, which I am sure is close enough for my purposes).

The alum is added to a glass of boiling water, which is then added to a pot of warm water. The clean wool is added, and then the temp is brought up to 200*F and kept there for an hour. The photo below shows my wool just after it was added to the alum solution. I have about 10 minutes left, then I'll let it cool just until it's cool enough to handle, and then I'll rinse it with hot water. Since my siphoned madder dye is currently at room temp (and I'm not intending to heat it), I'd like the wool to be as warm as possible when I add it. I'll post photos of the actual wool dyeing process with tomorrow's madder update!

Monday, December 27, 2010

Madder Day 6 & 7

Day 6
Day 6 consisted of giving it a couple of quick stirs, once in the morning before we left for Mike's sister's house to celebrate a belated Christmas with my in-laws... and once again when we returned home that evening. Not really a very exciting day Madder-wise, so I didn't take any photos. (trust me, you didn't miss anything that isn't featured in the other photos I've posted so far) :)

Day 7
Today marks the beginning of the washing step in the madder pigment making process. My instructions asked me to dump my madder dye / alum solution mix into the larger bucket, and to fill with fresh water. below is a final photo of what the madder dye / alum solution looks like after sitting (with occasional stirring) for three days. it's darkened & reddened quite a bit, seems fairly opaque, and the foam on the top has pretty much disappeared.


I poured the dye / alum solution into the larger bucket, and here is a photo of me pouring in some fresh, distilled water. I added almost two gallons of distilled water.


Fortunately, my large bucket is marked on the side with liters. My directions don't specify how many liters of liquid I should have at this step, but I leveled it off at 10 liters to make things simple from here on out. (my upcoming instructions direct me to siphon off a percentage of the total liquid) :)


My madder mix will sit, undisturbed (assuming I can keep Mike away from it) for 36 hours. The goal at this stage is for the now-dyed alum to settle out at the bottom. Soon, it will undergo several days of siphoning, and rinsing with fresh water before the final filtering where I can collect and dry the pigment.

Saturday, December 25, 2010

Madder Day 4 & 5

Day 4
On the afternoon of Day 4, it was time to take my madder dye off of the low heat, and filter it. I setup a bucket, lined with a cotton dish towel, with a sieve resting on top. my instructions actually called for a fine cotton bag... which is what I thought I had. upon closer inspection of the package I had, it actually said "flour sack towels" not "flour sack" ...but it turned out to work just as well.


By this time, the madder had cooled a bit, and the dye is still very dark

I poured the dye bath through the sieve, catching all of the bigger chunks of of madder root

Next, I gathered the cotton towel, lifted it out of the bucket, and placed it back in the sieve. It filtered out the finer madder root debris from the dye.


Here's a picture of the fine debris the cotton towel caught


Meanwhile I weighed out 60 grams of alum (once again, the internet told me it was approx 2.12 ounces) :)


Next, I measured out 1200mL of distilled water, and warmed it to 40*C

When I poured the alum in, most of it sunk directly to the bottom of the beaker. It did eventually dissolve, but it took several minutes of stirring.


Once dissolved, the water still looked a bit cloudy. My understanding is that the alum will eventually settle back out of the water. The idea is to attach the color to it first, so that when it settles, it becomes the pigment.

With Mike's help, we slowly poured the alum solution into the dye while stirring constantly. It created an orange froth on top of the dye, which my instructions indicate is a good thing. Now it's time to let it sit for 3 days, stirring once or twice a day.


Day 5
After stirring today, I noticed that the dye and froth had turned significantly more reddish. Must be the alum that made the difference? It will sit like this for another two days.

Friday, December 24, 2010

resolutions new and old

first, a look at the resolutions i set for 2010...

" i want to lose weight"
ok, technically i met this one, since i lost about 5 lbs in 2010. then I hit a plateau. I did manage to go on a 3 week road trip with my mom without gaining weight (which was a nice accomplishment)... but i've since put this goal on hold, and am focusing on a different project for now.

"I want to spend more time with my favorite people"
Hillary and I talked about doing Champagne Thursdays, and my UW artist friends have been wanting to get together more often ever since we graduated in 2004. I don't think Hillary and I ever actually did a Champagne Thursday (well, maybe once)... and I did get together with my UW artist friends in November for an early Thanksgiving at my house.... overall I'm sure I could have put more effort into this one. I did quit drinking altogether in September, so the champagne would be out for now... but that doesn't mean I can't spend more time with my favorite people. lets call this one a work in progress.

"I want to do monthly movie nights"
I totally completed this one! Each night was accompanied with a food theme too. Here are the movie themes I hosted in 2010:
January: Film Noir
February: Love Movies
March: Hitchcock Movies
April: French Movies
May: Bette Davis Movies
June: Marilyn Monroe Movies
July: Kung Fu Movies
August: Bollywood Movies
September: Cult Classic Movies
October: Scary Movies
November: Screwed Up Family Movies
December: Christmas Movies

"I want to host more game nites"
totally didn't do this one! I think we had Harvey over to play Mario Party a couple of times, but I'm not sure if that counts?

"I want to pay attention and spend more time at SAM"
I wrote that I wanted to do at least 2 art walks in 2010 - I think I did one... but I did spent a lot more time at SAM. I bought a membership and have been to the last few special exhibits. I also bought series passes to their film noir series, and went to all of the films, which I suppose also counts as spending time at SAM.

"i want to do recipe surprise on Tuesdays"
This one had to do with recipes that were being published in the weekly Zine I was getting at weight watchers. I did follow through on this one for a while, until the weekly recipes quit being entrees, and started being desserts and appetizers, which I didn't feel fit very well into my regular eating plan - so rather than force it, I abandoned this one.

"I also plan to return to doing Yoga this year"
Totally did this one! I took a little break for a while in the middle of the year, but I did go to quite a few yoga classes, and am currently in the middle of a gentle yoga series. I also started doing Zumba this year!

"i want to choose one of the classics to read this year"
Done! I read The Handmaid's Tale by Margaret Atwood way back in January. I made a little progress on my journey through the Harry Potter series, and completed the entire Twilight Series (including the short story about Brie Tanner) over summer break. They're not classics, but they did fit in with my wanting to read more for pleasure. (the Twilight books are significantly better than the movies, i'm pleased to say).

"I want to draw and paint more!"
Done! This one was more than a success - it has blown up and flourished and grown to be an important part of my life. As part of my original goal, I wanted to attend at least 6 drawing sessions - I set the goal for one every two months. I totally blew that one out of the water by going to 13 model sessions (11 Dr Sketchy sessions w/ burlesque models, 1 session at the Little Red Art Studio w/ 2 nude models, and the annual Gage Drawing Jam w/ a wide variety of models to choose from), and a life drawing class. I also organized my studio and started painting a self portrait, completed a ceramic painting, and a drawing commission. I've also followed my curiosity about the origin of pigments on a meandering journey that has lead me to a variety of new places (both physically and artistically). To name a few, I've become a regular at a rock and gem shop where I've purchased rocks that have historically been made into pigments, I've discovered the link between pigment and dye which lead me to become a regular at a yarn and fibers shop, where I bought my first natural dye kit, several skeins of wool and alpaca natural yarn for dyeing purpose, and learned how to knit. I'm currently in the middle of a project working with madder roots to create a dye, from which I will create a pigment, which I'll use finally to make oil paint. Come spring, I'm also intending to plant some Indigo, so I can produce my own indigo dye and paint. through a friend's advice, the knitting has lead to felting, which has circled around to feed my hat fetish. I've also been brainstorming a number of ways that I can incorporate the fibers and the dyes into my painting projects.


As for 2011.... here are a few resolutions I have in mind:

1) Monthly Drawing Sessions
I've really enjoyed the monthly model sessions I've been attending, and they've become something that I look forward to doing each month. Mike has been going with me, so in addition to keeping my creative spirit well fed, it's been a nice way for us to connect and make sure we spend some time together. (maybe every couple doesn't spend time together by going to look at nearly nude models... but that's how we roll at Chez Roshak) ;)

2) Monthly Movie Nites
I've really enjoyed getting acquainted with more movies in 2010 (by conservative estimation, I think I watched at least 95 new movies at my movie nights alone in 2010. That isn't even counting the many movies I've watched outside of the movie nights). From the comments I've gotten from several friends, I think it's become something bigger than just me, too. Something that others are starting to look forward to. So who am I to disappoint? Movie night theme recommendations are quite welcome, though I have themes for January and February already. I'm doing films based on literary classics in January, focusing on books that I have read, but movies that I haven't seen. In February I want to re-visit Love movies, as I was not quite satisfied with the selection that I came up with for Feb '10's Love Movie nite.

3) An Autumn Vacation in the South
Mike and I went to Phoenix, AZ for a friend's wedding at the beginning of November this year. It was starting to get cold and dreary at home, and although the trip to Phoenix was a whirlwind of a weekend trip - it was an amazing experience to go and get some sun that time of year. It completely rejuvenated us, and we've been talking about making it an annual experience. We're open to any sun filled US destination once the weather turns cold and gross at home.

4) Read another Classic
Although I only managed to complete one classic novel in 2010, I do love reading them. To give myself a little motivation, I'm going to set the goal to read at least one more in 2010. (though more than one would be nice).

5) Finally Finish that Friggin' Harry Potter Series
I've simply been working on this one for far too long - it's time to complete this one. I'm currently halfway through book 3. Ideally, I'd like to finish the series before the final movie comes out. I've had some unanswered questions and confusion since the Half Blood Prince movie came out. I'd like them answered before I see the final movie.

6) Clean my Car More Often
I recently vacuumed out my car - and considering that I couldn't actually remember the last time I vacuumed out my car, it was way overdue. Considering the level of gross that I found in my car, it's most appropriate that I set a formal goal to do this more often, and hopefully prevent the gross from getting quite that bad again.

7) Complete my Post-Bacc Certificate & Obtain the CAPM Certification
I have one more class to complete to earn my Post-Bacc certificate in Project Management. I'm currently signed up for the course, which will start in January, meaning that I should have my certificate by mid-March. In order to complete the CAPM Certification through the Project Management Institute (PMI), I need to take a test. I've already completed the paperwork to qualify to take the exam - the next step is to pay for the exam and schedule it. I'm intending to pay for it early in the year, and would like to schedule it for May or June. Assuming I pass the first time, I could be certified by summer. In order to make that a reality, I'll need to do some research to see what is on the exam, and see if I can find some practice questions. It's kind of expensive as far as exams go, so I don't particularly want to have to re-take it.

8) Send Birthday Cards
This may be a crazy one to accomplish. I have 15 nieces and nephews alone - all but one on Mike's side of the family, and 5 of whom I've never actually met. (1 I'm meeting on Sunday for the first time. He's an infant... the other 4 I probably won't meet any time soon unless I take a vacation in Georgia to see Mike's brother and his family. I haven't met his wife yet, either!)... I did make an attempt at sending out birthday cards a couple of years ago, but it got derailed fairly quickly because of some unfortunate work-related stress. This time I think the key to success on this one is going to be better planning and preparation. If I buy cards early and organize them, it should be a simple task of getting them to the mailbox on time. (or so I hope). Want to be on my birthday list? Make sure I have your birth date and your mailing address, please. :)

9) Work Out, Etc.
For this one, I'm intending to continue both yoga and zumba, and am aiming for doing something along these lines twice a week on average. While it may be unrealistic to do twice a week every single week, it should be reasonable to aim for twice a week on most weeks. I want to open this one up to include anything physical, which could include dance or hiking, or something completely new.

10) SAM, Art, and Art Adventures
Building on what I started in 2010, I want to spend plenty of time at SAM in 2011. There are also a number of other places to see art in my area, plus all of the museums and galleries I can find and explore when we travel. Hillary mentioned setting a goal to do something art related once a month, which could also feed this resolution quite nicely. Mike also gave me a book titled The Daily Book of Art, which has a page a day providing interesting bits of information about the art world, and every 10 days there are instructions to complete an art activity. I put it on my wish list when I bought the same thing for Hillary for Christmas, so interestingly enough, the two of us could be charging through this book together. I'm starting mine on January 1st.

Thursday, December 23, 2010

Madder: Day 3

Below are a couple of photos from day 3. I'm currently 24 hours into the 36 hours required for the dye to sit over low heat at 40-45*C. I've spent my day watching rather odd movies, and checking my beaker of dye periodically to make sure the temp is still between 40-45*C. It took quite a while to get the setting on the stove just right, but once I did, it's stayed pretty constant all day.

This morning there was a little bit of pink foam around the edges of the beaker. The first photo was taken this morning when the dye had been on the stove for around 12 hours.

And the next photo was taken at about 24 hours over heat. the pink foam has disappeared, but the roots are looking thoroughly soaked and swollen. The dye seems maybe a little more purplish now.


I've got about 12 more hours before I can turn the heat off, and hopefully now that the temp has stabilized, I'll be able to get more sleep tonight than I did last night!

Wednesday, December 22, 2010

Madder: Day 1 & 2

day 1
i suppose technically speaking, yesterday was day 1 of my Madder project. i spent yesterday acquiring and gathering supplies. my shopping list consisted of the following items, some of which i had no idea where one might purchase them:


3 liter heat resistant glass container (such as a mason jar or beaker)
2 liter heat resistant glass container (such as a mason jar or beaker)
15-20 liter plastic bucket
10 liter plastic bucket
chemical filter papers
siphon
60 grams potassium carbonate (potash)

although my recipe (located here: http://www.rubioviolins.com/Pages/lake1.html) did mention that i could use regular tap water, i've gotten some odd and unexpected results with other dyes, which are potentially related to my tap water (it's a working theory that is by no means necessarily true)... but I didn't exactly want to take a chance on my tap water, considering the time investment i'm planning to put into this project. so I added distilled water to my shopping list. I also had a number of other supplies already on hand. The oddest items on my shopping list were the chemical filter papers and the potassium carbonate, followed my the glass containers - which were not odd per se, but I wasn't sure where to locate some quite that size.

I started by asking my science teacher friend, Tam, if she had an idea of where I could find the chemical filter papers. She knew what they were, of course, but she didn't know where to acquire them locally. She said she had a number of them in her classroom, but mentioned that her and her husband usually order them rather than purchase locally. My recipe noted that they could be purchased through a lab supplier, which was a start. I did a local google search for "lab supplier" - I called the first one that came up in the list, which turned out to be a lab, not a supplier. the second turned out to be a wholesaler, but they did happen to know of another supplier in Monroe (a bit over an hour away from me) that did retail sales. So I called All World Scientific, and described my rather strange situation - which was that I sort of knew what I needed, but not exactly. She had a number of chemical filter papers available - I don't know enough about what I'm doing or about the differences between the types of chemical papers to be able to decide which one is going to work best - and neither did she. We made a best guess based on diameter of the filters and pricing. I also asked about beakers, which she could also provide, but she had limited sizing. I ended up with two 3-liter beakers, which I can't imagine will hurt my process. Better too large than too small, I assume. Then I asked about potassium carbonate. She knew what it was (which was one step ahead of me), and said that she could order it for me, but didn't have it on hand. I declined, optimistically hoping I could track it down for same day purchase.

I sent Tam another message asking if she might know where I could acquire the potassium carbonate - to which she replied that she didn't know what it was. (maybe she does know what it is, but wasn't familiar with the term potash, which I used in the message, and which was used in my recipe. after yesterday I have quit using the term myself, since it doesn't actually seem to be a common nickname for the product, and i suspect my recipe originated in the UK). Next I got the idea to start calling my own people - I'm using it for an artistic purpose - maybe an art supply shop or a dye product shop would know? I called Daniel Smith (by far the best art supply shop in my area) - they seemed to know what it was, but didn't carry it. They offered me up another product, which I declined since it was not what I was looking for. Then I tried a local natural dye supply, Earthues - they also knew what it was, and understood exactly what I wanted it for, but didn't carry it. She did give me a good idea though - she mentioned that it is a product sometimes used with pools. I did another google search to see just exactly what the most common uses for it were. As it turns out, it seems that it's sometimes used in beer and wine making. Since I was already planning to stop at a home brew shop to pick up a siphon, I thought I'd call and see if they had it. Strange enough - they did!

I spent the next couple of hours driving around picking up my supplies. All World Scientific was a very difficult little place to locate. It was an unmarked suite in the back of a little gray building that wasn't exactly where the address said it should be.... but because I'm determined, I managed to find it, and thus found my beakers and filters. The home brew shop was easier. Mike is a regular customer at a home brew shop in Kirkland, so I knew it would be relatively easy to find. And sure enough, I got my siphon and my potassium carbonate. I stopped at Home Depot and the grocery store for the buckets and my distilled water. Finally arriving home with all of my supplies, day 1 was complete.

day 2
Day 2 began just a few hours ago. Once going, the first step of the process requires that my dye be kept at about 40-45*C (a bit over 100*F) for 36 hours. (no that is not a typo, I do mean a day and a half). So timing was everything here. I decided that it would be nice to begin around 10pm, so that my project would be ready to come off of the heat at 10am two days later. I also decided that it would be wise to have a good stock of movies on hand, since I will not be leaving the house for 2 days with the stove on.

First, I gathered together the supplies I would need for this step of the process. Pictured below are: my new 3 liter beaker, a gallon of distilled water, potassium carbonate, and my madder root.

First, I measured out 2400 mL of the distilled water. Fortunately for me, my beaker was labeled with mL.
Next up, I needed to add the potassium carbonate...

my instructions call for 60 grams of potassium carbonate. unfortunately my scale measures in ounces. Although it looks like it could be switched over to measure in grams, I couldn't find any setting or switch that would actually change it over (as far as I can tell, it is a big fat tease). ...so this is where practical application of math finally comes in handy, right? wrong. this is 2010 - who needs to know how to do this crap by hand when you can do a google search? and being the well educated individual that I am, i didn't search on wikipedia or trust the first site that came up. I compared answers from a variety of search results, to make sure there was consensus between sources. It actually came up that approx 2.12 ounces = 60 grams, but considering that my scale measures to the nearest 0.05 of an ounce, i just got it to read 2.15, then removed the smallest pieces until it bounced down to 2.10, and assumed it was close enough for my purpose.

I've always thought it was interesting how water goes suddenly cloudy when a powder substance is added, even if the powder eventually completely dissolves and turns the water back to clear. I'm sure there is a scientific explanation involving the undissolved particles reflecting or blocking the reflection of light, probably much like whatever scientific explanation there is for fog... it doesn't really matter much to me why it happens - i just find it interesting to watch. and so i included a photo of that too.

it did begin to dissolved, and as it did so, the water began to turn a bit orange.

once it was completely dissolved, the water was a nice gold color. This is just the distilled water plus potassium carbonate. (and once dissolved, it's back to a nice clear solution, i might add).

(i also think it's kind of fun to see the swirls of color, which are probably where higher concentration of the potassium carbonate are floating - again, I don't really need to know the why to appreciate the optically interesting effect below).


and next it was time to weigh my madder root. my recipe called for 160 to 180 grams of madder root, depending on how strong of a color you want. Obviously I want a nice strong color here, so I was aiming for 180 grams. Once again, I had to convert that to ounces. And once again this is 2010, and I see no need to bother with actual math here, so I turned to the internet once more, and came up with approx 6.35 ounces. That was a number I could certainly measure on my scale, and so you can see my 6.35 oz of madder roots below:

my recipe says they can be whole, chopped, or ground before adding them to the water. when I bought them, I bought whole roots because I wanted to be as close to my natural source as possible (although you can buy them ground). Not wanting to spend the insane amount of time to grind them by hand, I opted instead to coarsely chop them before adding them to my water. Although I did attempt using a knife for this, I discovered that simply snapping them in half with my fingers worked best. I added them to the water as I went, and as you can see in the next few photos, they began to change the color of the water immediately. After the first couple of handfuls of coarsely cut roots, the water had already changed from the golden color to a reddish/orange color.

A few more roots, and the water looked like an orange/tea color. I was not stirring the water at this point - just tossing roots in.

The next photo shows all of the roots in the beaker, but without any stirring. Even without the stirring, the water was a dark color, like coffee.


After finally stirring the mix, here's a view from the top. It has a nice earthy aroma to go with the wet wood look, too.

Although the dye is not cloudy, the color is so dark that it's nearly black.

Next i put my mix over low heat. I need to keep it at 40-45*C for a day and a half. Here it is, starting out at room temperature.

below are a couple of views of the dark dye while waiting for the temperature to rise to 40*C

And voila - it didn't take long to get it up to 40*C. I turned the temp down, and have been monitoring it for the past hour or two, trying to make sure it doesn't heat to more than 50*C, but also trying to keep it at least 40*C. It did rise to about 45*C before going back down a bit. It has been hovering right around 40*C for about the past half hour, which is right where I want it.

Once I'm sure it's going to stay in that range consistently without my needing to adjust the heat, I'll settle in for my first daring night of leaving the stove on while I go to sleep. I feel suspiciously like I'm doing something dark and dangerous and rebellious. Surly you're not ever supposed to turn the stove on and go to sleep? (except when you're making madder root dye, I guess). Just in case, I'm sleeping downstairs, quite near the kitchen.

Friday, December 3, 2010

at long last

this is the slab of clay that i approached as a painting. the same said clay painting that lead to so much thought and discovery about my own artistic process, as well as thought and discovery about the possibilities (and limitations) of the materials that i've used. i haven't measured it yet, but i'd say it's around 15 inches wide, which i suppose is a moderate size for a ceramic piece, but a fairly small size for a painting. (once again, something that's relative to the medium being used)... Enjoy!


Wednesday, November 24, 2010

COCHINEAL - Day 2

The dye pot turned very purple because of the alum I used to mordant the wool...

After rinsing and washing, the result is the fuchsia color my instructions promised with the addition of alum. it's currently hanging to dry!

i used the left over dye bath to dye a second skein of wool. (it's actually a wool/alpaca blend for this one). i added some cream of tartar to balance the pH to get more of a reddish color. it worked very well. because the dye was somewhat diluted, it came out more of a hot pink color - though the dye itself is a very nice red. here's a picture of it in the dye bath...

and here it is hanging to dry. interestingly, the wool/alpaca blend held on to the color far better than my 100% wool has. almost no color ran out when i rinsed and washed it. you can see that the hanging skein is about the same color as it was when it was sitting in the dye bath too. (the white ties on the skein are from the cone of cotton that i used for my first scarf dyed in the beet dye - although they went through the exact same process as the rest of the skein, you can tell that they didn't hang on to any of the dye at all)

and finally... here are the two skeins next to each other. both dyed with the same cochineal. just a difference in the additives. i used alum to mordant both of them, and added cream of tartar to the dye bath for the skein on the left. both are currently hanging to dry!